“I need the data off of my G2 gyratory compactor. Can you help me understand what data is saved and how it can be retrieved?”
Of course we can help you.
We provide a complete explanation on how the Pine G2 Superpave gyratory compactor handles data over a 3-part series of blog posts.
The first article presents the basics—the data saved, the number of files saved, file naming convention, and file formats.
The second article explains how to print data from a G2.
This third post describes saving Pine G2 data .
Menu Navigation
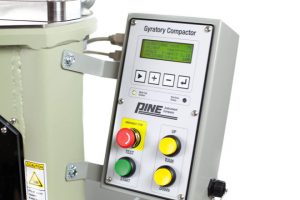
The G2 provides four buttons located immediately beneath the display to navigate the menu system and make selections. Press the left button, the arrow head, to select the desired line in a menu. Toggle between options by pressing the “+” or “-” buttons. Access submenus and save selections by pressing Enter, the right button.

The Common Screen for Exporting Data
Navigate to the common screen for printing and saving Pine G2 data using the following instructions.
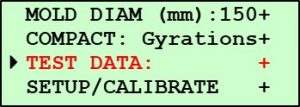
- Select TEST DATA in the second screen of the Main Menu.


- Press ENTER.
 Start on this screen for printing and saving Pine G2 data.
Set the File Type(s) Saved
The G2 saves .DAT and .TXT files. Set the a G2 to save .DAT files only or .DAT and .TXT files simultaneously using the instructions below.
- Select Save .DAT File.

- Press ENTER.
- Select the file with the desired data.

- Press ENTER.

- Select Type .DAT + .TXT +. A G2 saves both .DAT and .TXT files if Type .DAT + .TXT is displayed (as shown) and only .DAT files if Type .DAT is displayed. No option exists to save only .TXT files.
- To save on .DAT files, press ENTER. This changes the line to Type .DAT + and only .DAT files will be saved.

- Select Exit.
- Press ENTER.
A G2 saves the .TXT file based on the report style selected for printing (See the Setting the Printout Format section in the blog on printing.) It saves the Wide-Full format report if Wide-Full or Narrow report styles are selected and Wide-Brief if Wide-Brief report format is selected.
USB Flash Drive
Not just any USB flash drive works in a G2. Some work while others do not because of the internal chip set. Contact Pine for a USB flash drive known to work.
Saving Pine G2 Data to a USB Flash Drive
A G2 automatically saves data to a USB flash drive when the drive is in the machine at the end of compaction.
Manually save a specific file to a USB flash drive using the following instructions.
- Select Save .DAT File.

- Press ENTER.
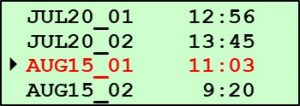
- Navigate to and select the desired file. The machine stores 20 files, but only displays four at a time.

- Press ENTER.
- Select Save Selected File.

- Press ENTER. An activity screen appears as the machine checks for a USB flash drive.
 This screen displays if no USB flash drive is found. Insert a USB flash drive and press “+” to continue or press “-” to exit.
 When a USB flash drive is found, this activity screen appears.
 The machine displays this screen when saving is completed.
- To save another set of data, go back to Step #1 above.
- To exit, press ENTER.
Manually save all 20 data files at one time to a USB flash drive using the following instructions.
- Select Save All .DAT files.

- Press ENTER.

- Insert a USB stick if one isn’t already inserted.
- Press ENTER to continue. (If no USB stick is available, select Cancel and press ENTER to exit.)
 A G2 displays this activity screen while the files are saved to the USB flash drive.
 When all the files have been saved, this screen appears.
 - Press ENTER to exit.
Saving Pine G2 Data to a Computer
Transfer data to a computer by saving it to a USB flash drive and then to a computer or by connecting the compactor to a single computer or a computer network via the compactor’s network port.
Section 5 of the Operation Manual provides a detailed explanation for connecting a G2 to a computer. Contact Pine at pteinfo@pineinst.com and request a copy of the G2 Operation Manual.
Three scenarios exist for connecting a G2 and a computer.
- Receive an IP Address from a DHCP server, the default mode. The server may be a router or another computer on the network. It requires a standard CAT5 cable.
- Manually assign an IP Address to the G2 on the network. This requires connecting the G2 with a standard CAT5 cable.
- Connect the G2 to a standalone computer with a “crossover” style CAT5 cable. Manually assign an IP Address to the G2 and the computer.
Want to Learn More?
Read the first article that presents the basics—the data saved, the number of files saved, file naming convention, and file formats.
Peruse the last blog on printing Pine G2 data.
Do you have a Pine GB1? Take a look at a set of articles on the Pine GB1 data-the basics, printing, and saving.
Visit our website or speak with one of our specialists at 724-458-6393.
Follow us on LinkedIn and Twitter and subscribe to our YouTube channel.


